Friday, December 18, 2015

Nutro Moist-n-Chewy Bites - chewy.com Product Review

One day, after a wondrous romp on the beach,

@itschewytime on

promptly followed by a dreadful bath... 

@itschewytime on


...Chewy spotted a package at the door. According to Chewy logic, all packages are for Chewy, and thus all packages are exciting! It was a chewy.com delivery waiting outside! And so, all was forgiven, evil bath and all.

A chewy.com package at the door!

And what was inside the exciting box? Nutro Moist-n-Chewy Bites in Hickory Smoked BBQ Flavor! Chewy thought it smelled amazng. To the people nose, it smells like BBQ sauce.

Mmm...smoky flavor

He even tried to help himself to a couple, which is not proper Chewy behavior.

Maybe I can sneak just a little taste?


They are little, bite-sized treats, and are indeed moist and chewy. They are also a bit oily, so I would not recommend putting them in your pockets.

Bite-sized yum!


They work great for plugging the hole at the top of a Kong if you're filling it with liquidy foods like yogurt, because they're pliable and form a nice seal. No leaky Kong filling over here!

Can I have it now?

They are pretty much like gummy fruit snacks for people, except meat flavored and made from dog-safe ingredients. And just like candy, I do not think these are very nutritious. Nevertheless, they make a great occasional treat- they have a strong scent and chewy texture that Chewy loves and is willing to work for, and true to the Nutro philosophy, they are made with 100% natural ingredients.


Disclaimer: We received a bag of Nutro Moist-n-Chewy Bites Hickory Smoked BBQ Dog Treats from chewy.com for review purposes as part of the chewy.com Blogger Program. We did not receive any monetary compensation for this post, and all opinions shared above are our own.

Tuesday, November 24, 2015

Meat Pie for Dogs- Treat Recipe using Caru Stew

The holiday season is upon us, which is a giant excuse to eat and eat and eat. Of course, even Chewy gets to feast during the holidays! Last Thanksgiving we roasted an unseasoned turkey and some veggies for him. This year he is also getting pie. MEAT pie. [[Complete recipe is towards the end of this post]]

PIE!

Caru stew for a pre-made filling

Caru stew (check out our review here) makes a perfect pot pie filling as it is thick and saucy, full of healthy meats and veggies, and already cooked-through. All I had to do was whip up a pup-friendly pie crust, pour in some Caru stew, and pop it in the oven. Easy-peasy!

If making pie sounds intimidating to you, then pup pies might be the perfect practice. They are smaller, so you'll go through fewer ingredients, and your pup will (most likely) not judge and thoroughly appreciate the outcome.

Ingredients for dog-friendly meat pie, food processor optional

There are just a couple of ingredients for this pie recipe:
- Caru stew (any flavor)
- whole wheat flour
- ground flax seed
- coconut oil (+ peanut butter if desired)
- ice water
- egg (optional)

Whole wheat flour contains more nutrition than white flour, but still provides gluten to hold the pie crust together nicely. Flax seed contains omega-3's for healthy skin and coat, and also provides fiber for good digestion. Ground or milled flax seed is much more digestible than the whole seeds.

Pie for people is typically made by cutting cold butter/lard/shortening into flour and mixing in ice water so that the little solid chunks of fat give off steam while baking, creating a flaky crust. I have substituted that for coconut oil, which is more dog-friendly and boasts a number of health benefits, including improved skin and coat. However, if your dog is not used to consuming coconut oil, eating too much at once may cause diarrhea. A small serving of pie should not pose a problem, but if you are concerned, you can substitute half of the coconut oil for unsalted peanut butter. The crust will be less flaky, but in exchange, it'll have the peanut-y taste that many dogs love. At this time of year, coconut oil is typically pretty solid when sitting out at room temperature, but if that is not the case for you, chill the necessary amount beforehand.

Prepping pie for people involves letting the dough rest to allow the gluten to relax, preventing the crust from shrinking in the oven. Since pup pies are on a much smaller scale, I didn't find this step necessary and left it out.

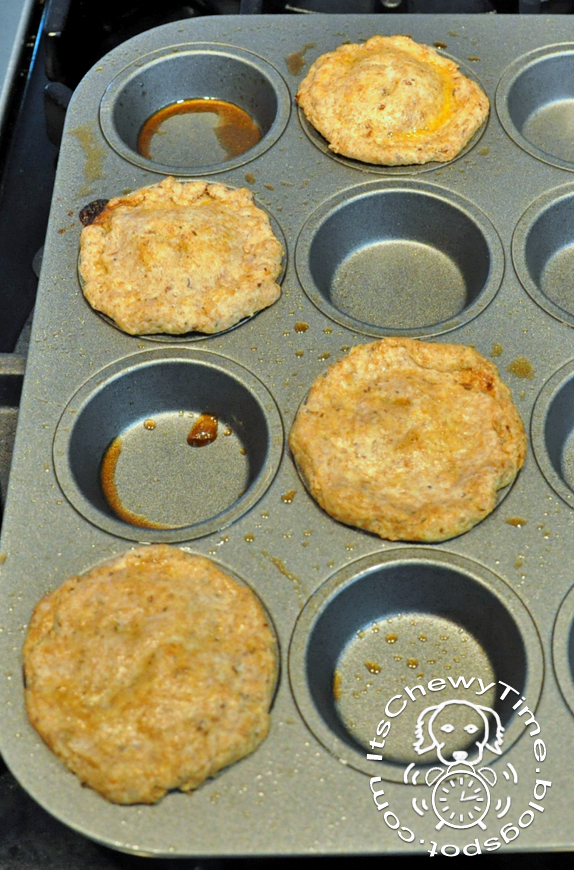
Use little pie pans or ramekins, or even muffin pans.

Mini-muffin-sized pies (post-baking)

Little pie vs. big pie

To get the pie shape, you can use any small, oven-safe dish, such as a mini pie pan, ramekins, or even muffin pans. Grease your pie pan so that you'll be able to easily pop out the finished pie. I used a coconut oil cooking spray, but you can also just smear some coconut oil.

To get the classic shiny pie look, you can coat your pie with an egg wash before baking. The egg wash is just an egg beaten with about 1 tbsp of water. You can cook the remainder of the egg mixture for yourself or your pup. If you bake it in a little dish, it comes out like a firm egg custard.

Before popping your pie(s) in the oven, don't forget to cut holes to allow the pie filling to vent while it bakes. Try to make the holes big enough so that they won't seal shut while baking, but not so big that the stew starts spewing out. You might want to place a tray under your pie pan to catch any drips or splatters.

This recipe yields approximately one 5" pie, or three standard muffin-sized pies, or six mini-muffin-sized pies. You can halve, quarter, double, etc. as necessary. While making conversions, keep in mind that
1 tbsp = 3 tsp, and 1 cup = 16 tbsp.

If you end up with leftover pie crust, you can flatten it out to 1/4" - 1/2" thick and bake it along with the pie. It'll turn out like a biscuit.

And, without any further ado, the recipe:

Meat Pie for Dogs Using Caru Stew

Ingredients:
  • 1/2 cup whole wheat flour
  • 1 tbsp ground flax seed
  • 2 tbsp coconut oil (or 1 tbsp coconut oil & 1 tbsp unsalted peanut butter)
  • ice water
  • Optional: 1 egg + 1 tbsp water

Directions:
  1. Preheat oven to 375°F. 

  2. Using a food processor or by mushing with a fork, combine the whole wheat flour, flax seed, and coconut oil (and peanut butter) until it resembles little crumbles.


  3. Mix in ice water (just water, not the ice) a little at a time, until large chunks form. It takes approximately 3 tbsp. of water. Using your hands, fold the dough until you can form a ball.


  4. To make the bottom crust, take a portion of the dough, sandwich it between 2 sheets of wax paper, and roll it into a circle 1/8" - 1/4" thick. 


  5. Transfer the bottom crust to your greased pie pan and gently push it into the shape of the pan.


  6. Fill the bottom crust with Caru stew.


  7. Roll out a top crust the same way as in Step 4, and gently place it on top of your pie assembly.

  8. Trim the crusts to the desired size and seal the edges by pressing the two crusts together.

  9. Optional: Decorate the edges of the pie by indenting with a fork, pinching, etc.


  10. Optional: Beat the egg + 1 tbsp water, and brush a thin layer over the top crust.


  11. Cut vent holes in the top crust.


  12. Repeat Steps 4-12 if making multiple pies.

  13. Bake until crust is lightly golden brown, about 20-40 minutes, depending on size.


  14. Allow pies to cool completely before serving.


  15. Leftovers must be refrigerated, and may be reheated at 300°F for 10-20 minutes, depending on size. Again, let cool before serving.

As with all other treats, serve in moderation, in addition to a healthy, balanced doggy diet.

Happy Thanksgiving!


Disclaimer: We received Caru Real Beef Stew for review purposes. We were not compensated for this post, and all opinions expressed are our own.

Friday, November 13, 2015

Benebone- chewy.com Product Review

Chewy LOVES receiving packages. For awhile, if we were out on a walk and he saw a delivery truck turn onto our street, he would hurry home to see if it was for him. He is slightly less of a delivery stalker now, but he is super excited to be joining the chewy.com blogger program! Every month we will get to review one of their products, and more deliveries = happy Chewy!

All packages that enter our house must be given a proper sniff-over, and sometimes he'll claim them and bring them to his bed, like this month's product. It's a sign that something good is inside!

"Wanna cookie?" Yes.

We received a Benebone Wishbone Chew, an inedible nylon chew infused with natural flavoring. 

Some info on Benebone:
  • sourced and made in the USA
  • comes in three sizes (mini for dogs < 30 lbs, regular for < 70 lbs, and jumbo for 70+ lbs) 
  • comes in three flavors (bacon, peanut butter and rotisserie chicken)
  • a portion of all sales gets donated to animal welfare organizations

We got the new Jumbo Wishbone, which currently only comes in bacon flavor. It's about half the length of his forearm!


Chewy's first order of business was to sniff, paw at and roll on his new Benebone. Cuz Chewy's kinda crazy! He got so excited about it, he couldn't function normally for a few minutes.


Eventually, he settled down and started chewing. The curvy wishbone shape makes it easy for him to hold, and the bacon flavor keeps him interested for long periods of time.

*chew chew chew*

Mmm...bacon!

Chewy loves his Benebone so much, he carries it around the house. Sometimes he'll suddenly remember that he left it somewhere, and run off to get it. Here he is napping with it by his side:

Mine.

After some hard-core chewing, the nylon gets a bit jagged and raggedy. I tried to get a picture of it, and Chewy swooped in and stole it:

Mine!

Chewy likes to chew stuff on his bed, which is also where a lot of his shed fur accumulates, so the rough ends of the Benebone pick up a lot of fur. Chewy couldn't care less, but I pick the fur off regularly for him.

While Benebones are not edible, the little bits that might get scraped off and eaten will pass safely through your dog. The company suggests supervision and monitoring for significant deterioration, such as a crack, at which point it needs to be discarded.

We give the Benebone Wishbone Chew 4 paws up! It is easy for Chewy to hold firmly while he chews, and it is much safer than the sticks he keeps munching on outside (he has gotten a piece of stick stuck in the roof of his mouth twice now). Compared to an edible chew, the Benebone keeps him occupied for longer, and doesn't add calories to his diet. 

4 paws up for Benebone!


In other news...

For every Wellness product purchased at chewy.com from now until December 16th, 1 meal will be donated to an at-risk animal through the Jackson Galaxy Foundation. For every Wellness Autoship purchase, 2 meals will be donated. If you were planning to stock up on Wellness, now's a good time!

Even if you currently have no need for Wellness products, you can still help out animals in need: for every like, comment and share on this Facebook post, Wellness will donate 1 meal, up to 50,000 meals. Please consider helping to feed a hungry fur-belly. Thanks!


Disclaimer: We received a Jumbo Benebone from chewy.com for review purposes as part of the chewy.com Blogger Program. We did not receive any monetary compensation for this post, and all opinions shared above are our own.

Tuesday, October 20, 2015

Steamed Acorn Squash for Dogs

Autumn has brought colorful leaves and cooler weather, which Chewy thoroughly enjoys...


...but Autumn also means lots of winter squash is available! The supermarkets, farm stands and garden centers are teeming with all kinds of squash, from acorn, to butternut, to miniature & giant pumpkins. Chewy would like to eat them ALL.


The most notable health benefit of winter squash for pups is the high soluble fiber content, which promotes good digestion. Winter squash is also high in Vitamin C, beta-carotene, and potassium, among other nutrients.

Cooking winter squash makes it more digestible for dogs (and humans). STEAMING winter squash is easy, relatively fast, and can preserve more nutrients than other methods, such as boiling or roasting.

All you need is some kind of steaming apparatus that will keep your food out of the water that's producing the steam, while still allowing steam to reach the food. There are all sorts of gadgets available on the market for steaming food, from pots with special inserts, to steamer baskets, to fancy steam ovens. If you don't have one of those, you can make a makeshift steamer using a pot with a lid: simply place a heat-safe plate on top of a small wire rack or even atop a few crumpled up balls of aluminum foil (don't use a non-stick pot for these- it'll scuff up the coating!).


I used acorn squash here, but the same principles can pretty much be applied to any kind of edible winter squash.

Waiting is the worst part for a Chewy

After steaming, you might see some spots of white goo on the surface. It is nothing to worry about- just some starch rising up and getting cooked.


Steamed Acorn Squash for Dogs

Step 1: Get your steaming equipment going so that it will be steamy by the time your squash is prepped.

If using a pot (with a lid), you want the water level to be high enough to not dry out during cooking, but low enough to not come in contact with your squash.

Step 2: Wash the squash, scrubbing gently with a veggie brush to remove dirt and other impurities.

Step 3: Use a sharp, sturdy knife to chop the squash in half. Cutting to one side of the hard stem will make it easier.


Step 4: Using a metal spoon and a some muscle, scrape out the seeds and stringy bits. Discard them or save the seeds to roast for human consumption. If your steaming pot is small, you might need to cut the squash into quarters to fit.


Step 5: Steam on medium heat for 15-20 minutes, until squash is easily poked with a fork and appears somewhat translucent.


Step 6: Scoop out the flesh of the squash and discard the skin. Let cool completely before serving. Serve small chunks or purée (use a food processor or blender).

Gimme gimme gimme

Squash purée

Store leftovers in the refrigerator, or use the squash purée to whip up some doggy treats!

As with all other treats, feed steamed winter squash with moderation, in addition to a healthy, balanced doggy diet.

Thursday, October 8, 2015

Pineapple Harvest!

Chewy and I LOVE pineapple. Did you know that you can grow new pineapples from the tops of the fruit? Although they are tropical plants, they do well in pots and therefore can theoretically be grown anywhere in the world (with some effort and much patience). Googling "how to grow a pineapple" will bring up plenty of instructions, tips and tricks.

Two years ago, I prepared a bunch of pineapple tops for planting, and this spring one of them flowered! It looked like a miniature pineapple, but covered in little purple flowers. After flowering, pineapple fruit takes about 6 months to mature.

A few months later, it looked like this:

Green pineapple

And another month later, it was pretty much yellow all around:
Yellow pineapple!

After 2+ years of waiting, our pineapple was finally ready to eat! You could smell it from about a foot away, but of course Chewy had to get his nose way up close:


 Chewy, being the food fanatic that he is, was very excited.
Can we eat it now?

You can see just how tiny our pineapple was compared to Chewy! Sorry I don't have any pictures of the inside of the pineapple...we were too busy eating! But it was wonderfully golden, sweet, and DELICIOUS!


Monday, August 31, 2015

Our First Egg!

On Saturday we got the first egg from our chickens!!!

To help the chickens know where to lay their eggs, I placed golf balls in their nesting boxes. Apparently, chickens like to lay where other chickens have laid before, so the balls are supposed to mimic eggs, and it worked! Tater Tot the Rhode Island Red hen laid her first egg right next to a golf ball.

Tater Tot's first egg! (+golf ball)
Chewy was very interested in the egg, of course!

What's that? Can I eat it?
On Sunday, I caught Tater Tot in the nesting box rearranging the hay for her next egg.

Tater Tot the Rhode Island Red hen
This time, the golf ball got buried in the corner.

Tater Tot's 2nd egg
Today, she laid another egg. Three eggs in three days! A chicken's first eggs can be abnormal as their system kicks into gear, but Tater Tot did very well!

Tater Tot's 3rd egg
So far, we have only eaten her first egg. We cooked it along with an ungraded farm fresh egg and a supermarket XL free range egg for comparison. The first egg is always the smallest, so Tater Tot's is the little one at the top:


Her eggs are getting the tiniest bit bigger each day. They should eventually be XL. Chewy only cares about eating them, though!

I can has?!?


This is the face he made after his first bite of Tater Tot's egg (we shared it). I think he was pretty pleased!

Yum!
Cadbury the Red Star hen is almost ready to lay eggs, too:

Cadbury the Red Star hen

And, just for fun, my favorite chicken, Poopiebutt the Easter Egger hen, with floofy cheeks:

Poopiebutt the Easter Egger hen
I love that the chickens look right at my camera! They are such funny creatures.